Coaxial Plug Assembly
Page By M0RGG
Info taken from the VHF/UHF
Manual, ISBN 0 900612 63 0
BNC
Male
BNC
Female
N type
UHF
PL259
- Cut end of cable even. Remove vinyl
jacket 3/4in.
Slide coupling ring and adapter on cable.
- Fan braid slightly and fold back as
shown.
- Position adapter to dimension shown.
Press braid down over body of adapter and trim to 3/8in.
Bare 5/8in of conductor.
Tin exposed centre conductor.
- Screw plug sub-assembly on adapter.
Solder braid to shell through solder holes.
Use enough heat to create bond of braid to shell.
Solder centre conductor to contact.
- For final assembly, screw coupling ring on plug sub-assembly.

Click To Enlarge
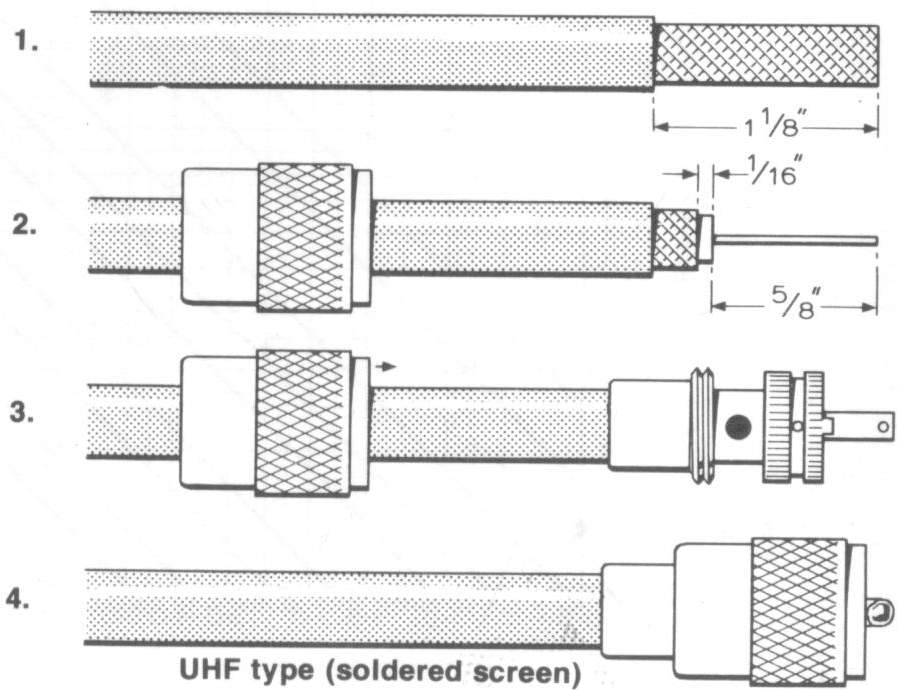
UHF type (soldered screen) PL259
- Cut end of cable even. Remove vinyl
jacket 1 & 1/8in.
- Bare 5/8in of centre conductor. Trim
braided shield.
Slide coupling ring on cable.
Tin exposed centre conductor and braid.
- Screw the plug sub-assembly on cable.
Solder assembly to braid through solder holes.
Use enough heat to create bond to braid to shell.
Solder centre conductor to contact.
- For final assembly, screw coupling ring on plug sub-assembly.
Click To Enlarge
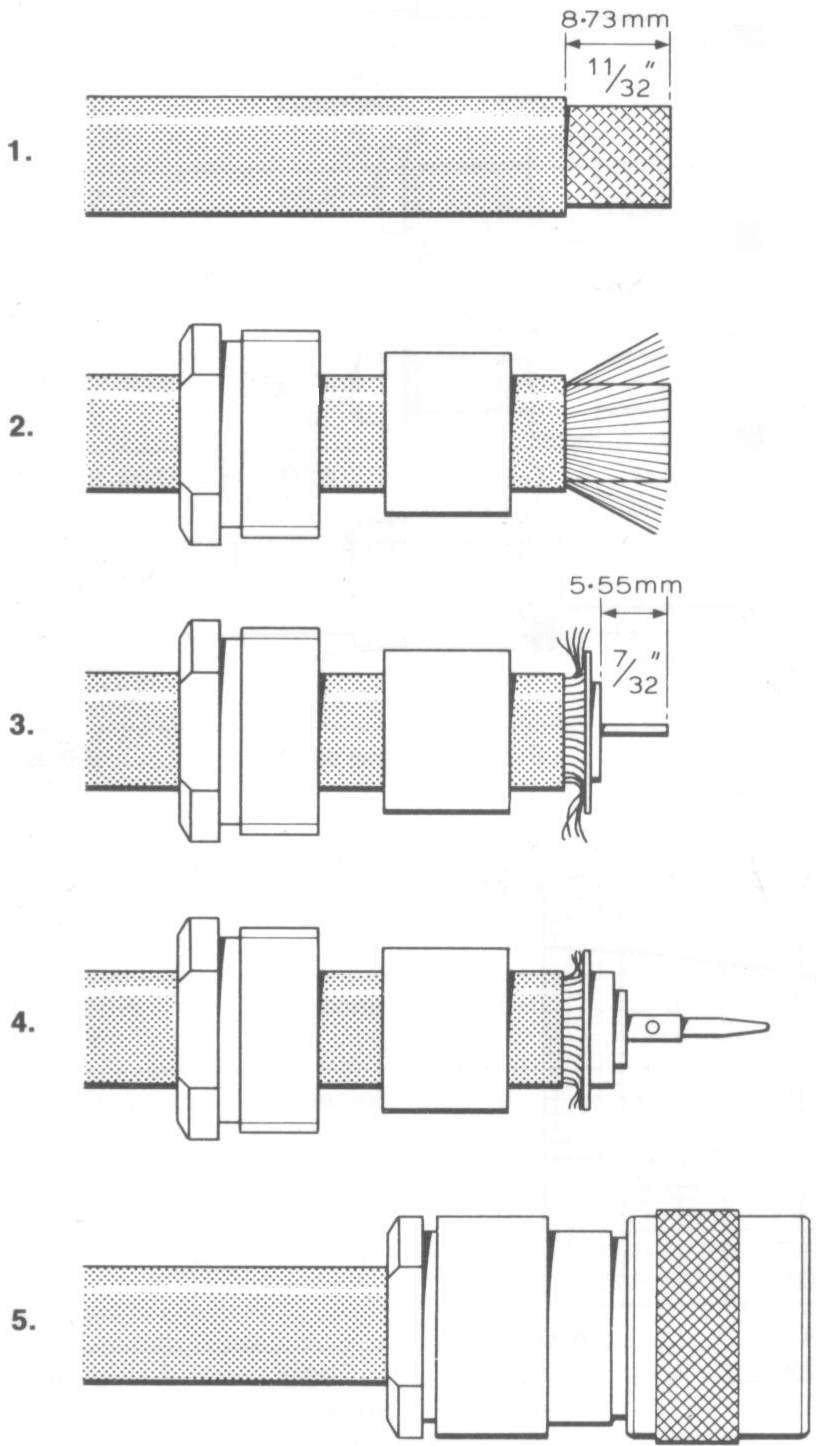
- Cut end of cable even and remove 8.73mm
(11/16in) of outer sheath.
- Slide the clamp nut and pressure sleeve
over cable.
Comb out the braid.
- Fold out braid back.
Insert the ferrule between braid and dielectric.
Trim off excess braid.
Remove 5.55mm (7/32in) of dielectric without damaging the inner conductor.
Tin end of conductor.
- Slide rear insulator over conductor
and position against end of dielectric.
Slide the male contact over the conductor until the shoulder of the male contact is pressed hard against the rear insulator.
Solder the male contact to the conductor but avoid over-heating.
- Fit front insulator in body and push
sub-assembly into the body as far as possible.
Slide pressure sleeve into body screw in the nut clamp tightly to clamp cable.
Click To Enlarge
Click To Enlarge
- Cut end of cable even and remove 7.93mm
(5/16in) of outer sheath.
- Slide the clamp nut and pressure sleeve
over cable.
Comb out the braid.
- Fold out braid back.
Insert the ferrule between braid and dielectric.
Trim off excess braid.
Remove 5.16mm (13/64in) of dielectric without damaging the inner conductor.
Tin end of conductor.
- Slide rear insulator over conductor
and locate shoulder of insulator inside recess in ferrule.
Slide the male contact over the conductor until the shoulder of the male contact is pressed hard against the rear insulator.
Solder the male contact to the conductor but avoid over-heating.
- Fit front insulator in body and push
sub-assembly into the body as far as possible.
Slide pressure sleeve into body screw in the nut clamp tightly to clamp cable.
Click To Enlarge
Click To Enlarge
- Cut end of cable even and remove 7.98mm
(5/16in) of outer sheath.
- Slide the clamp nut and pressure sleeve
over cable.
Comb out the braid.
- Fold out braid back.
Insert the ferrule between braid and dielectric.
Trim off excess braid.
Remove 5.16mm (13/64in) of dielectric without damaging the inner conductor.
Tin end of conductor.
- Slide rear insulator over conductor
and locate shoulder of insulator inside recess in ferrule.
Slide the female contact over the conductor until the shoulder of the male contact is pressed hard against the rear insulator.
Solder the female contact to the conductor but avoid over-heating.
- Fit front insulator in body and push
sub-assembly into the body as far as possible.
Slide pressure sleeve into body screw in the nut clamp tightly to clamp cable.
Click To Enlarge
Click To Enlarge
Info taken from the VHF/UHF
Manual, ISBN 0 900612 63 0
home